navision 2015

Creating and Using a Client Control Add-in –Bing Maps for Dynamics NAV


This walkthrough demonstrates how to create a Microsoft Dynamics NAV control add-in and use it on a Microsoft Dynamics NAV page. A client control add-in enables you to add custom functionality to the Microsoft Dynamics NAV Windows client and the Microsoft Dynamics NAV Web client by creating a control add-in that can run on both client platforms.

Important
This walkthrough addresses the Microsoft Dynamics NAV implementation of extensibility. This makes it possible to write control add-ins for all display targets. For information about how to write control add-ins specifically for Microsoft Dynamics NAV Windows client, see Extending the Windows Client Using Control Add-ins.

In a typical business scenario, developers create control add-ins using Microsoft Visual Studio Express, or Visual Studio 2013. Implementers of Microsoft Dynamics NAV solutions then use the control add-ins on Microsoft Dynamics NAV client pages, such as the Microsoft Dynamics NAV Windows client, the Microsoft Dynamics NAV Web client, or the Microsoft Dynamics NAV Tablet client.

Prerequisites

To complete this walkthrough, you will need:

  • Microsoft Dynamics NAV with a developer license. For more information, see System Requirements for Microsoft Dynamics NAV 2016.
  • CRONUS International Ltd. demonstration database.
  • Microsoft Visual Studio Express or Microsoft Visual Studio 2013.
  • Microsoft .NET Strong Name Utility (sn.exe). This is included with Windows SDKs.
  • Experience using Visual Studio.

Story

Simon is a software developer working for CRONUS International Ltd. He has been told that the users of the Microsoft Dynamics NAV Web client want to see Bing Maps displayed on the Web client. He wants to use the client extensibility framework to test how to do this on a separate page first.

Creating a Control Add-in With Visual Studio

Microsoft Dynamics NAV includes the Microsoft.Dynamics.Framework.UI.Extensibility.dll assembly that defines the model for creating Microsoft Dynamics NAV control add-ins. The Microsoft Dynamics NAV API provides the binding mechanism between the Microsoft Dynamics NAV control add-in and the Microsoft Dynamics NAV framework.

To create the control add-in

  • In Visual Studio, on the File menu, choose New, and then choose Project.
  • Under Installed Templates, choose Visual C#, and then choose Class Library.
  • In the Solution Name text box, enter the name of your solution. For example, you can enter BingMapsControlAddIn and then choose the OK button.
  • You will add a reference to the following assembly: Microsoft.Dynamics.Framework.UI.Extensibility.dll
  • In Solution Explorer, right-click your project, and then choose Add Reference.
  • In the Add Reference window, on the Browse tab, navigate to the location of the Microsoft.Dynamics.Framework.UI.Extensibility.dll assembly on your computer, and then choose the OK button. By default, the path of the assembly is C:\Program Files (x86)\Microsoft Dynamics NAV\90\RoleTailored Client.
  • Open the Class1.cs file and add the following using directive.
  • using Microsoft.Dynamics.Framework.UI.Extensibility;
  • In the BingMapsControlAddIn namespace, add the following code to declare a new interface named BingMapsControlAddIn.

namespace BingMapsControlAddIn

{

[ControlAddInExport(“BingMapsControl”)]

public interface IBingMapsControlAddIn

{

[ApplicationVisible]

event ApplicationEventHandler ControlAddInReady;

[ApplicationVisible]

event ApplicationEventHandler MapLoaded;

[ApplicationVisible]

void LoadMap(double latitude, double longitude);

[ApplicationVisible]

void ShowMiniMap(bool show);

[ApplicationVisible]

void ShowPushpin(string title, string imageName);

}

}

  • You will use the name BingMapsControl later in the walkthrough when you register the control add-in in Microsoft Dynamics NAV.

The assembly must now be signed to be used with Microsoft Dynamics NAV. The next steps will discuss how to sign the assembly.

To sign the assembly

  1. In Visual Studio, on the Project menu, choose BingMapsControlAddIn properties.
  2. In the Properties window, choose Signing, and then select the Sign the assembly check box.
  3. In the Choose a strong name key file drop-down list, select New.
  4. In the Key file name text box, enter BingMapsControlAddIn, and then clear the Protect my key file with a password check box.
  5. Choose the OK button.
  6. In Solution Explorer, notice the BingMapsControlAddIn.snk file that is added in Solution Explorer.
  7. On the Build menu, choose Build <Your Solution> to build the project. Verify that the build succeeds.

Copying the Control Add-in Assembly to the Microsoft Dynamics NAV Development Environment

After you build the control add-in, you copy the output assembly file to the computer that is running the development environment.

To copy the control add-in assembly to the Microsoft Dynamics NAV Development Environment

  1. On the computer, locate and copy the control add-in assembly file (.dll) file in the control add-in project’s output folder.
  2. By default, this folder is C:\Documents\MyDocuments\Visual Studio\Projects\[Your Addin Project]\[Your Class Library]\bin\Debug.
  3. On the computer that is running the development environment, paste the assembly in the Add-ins folder.

    By default, this folder is C:\Program Files (x86)\Microsoft Dynamics NAV\90\RoleTailored Client\Add-ins.

Creating the Manifest File

After you create an interface in Visual Studio that exposes a number of properties for the BingMapsControlAddIn, you must create a manifest file. A manifest file is written in XML and contains information such as where to look for resource files, references to external JavaScripts, and the size of the control add-in. For more information, see Manifest Overview. In the next steps, you will create a manifest file that loads a BingMaps control and you will register this manifest in the Client Add-in page.

To create the manifest file

  • Copy this sample manifest and paste it into any text editor.

<?xml version=”1.0″ encoding=”utf-8″?>

<Manifest>

<Resources>

Script.js

</Resources>


http://ecn.dev.virtualearth.net/mapcontrol/mapcontrol.ashx?v=6.3


InitializeMap(‘controlAddIn’);

Microsoft.Dynamics.NAV.InvokeExtensibilityMethod(‘ControlAddInReady’, null);

]]>


<RequestedHeight>300</RequestedHeight>

<RequestedWidth>700</RequestedWidth>

<VerticalStretch>false</VerticalStretch>

<HorizontalStretch>false</HorizontalStretch>

</Manifest>


Save the manifest to a file that is in same directory that the assembly is saved in, the Add-ins directory.

Name the manifest Manifest and make sure to add the .xml extension to the file, so that the file name will now be Manifest.xml.

The next step is to create a JavaScript file containing code that calls C/AL in Microsoft Dynamics NAV.

Creating a JavaScript File

Now you must create a JavaScript file to hold all of the code that calls C/AL in Microsoft Dynamics NAV.

To create the JavaScript file

  1. Copy this sample script and paste it into any text editor.
  2. var map = null;
  3. function InitializeMap(controlId) {
  4. map = new VEMap(controlId);
  5. map.HideScalebar();
  6. map.onLoadMap = function () {
  7. Microsoft.Dynamics.NAV.InvokeExtensibilityMethod (‘MapLoaded’, null);
  8. };
  9. }
  10. function LoadMap(latitude, longiture) {
  11. var mapOptions = new VEMapOptions();
  12. mapOptions.DashboardColor = “black”;
  13. mapOptions.EnableSearchLogo = false;
  14. map.LoadMap(
  15. new VELatLong(latitude, longiture), // Center
  16. 1, // Zoom level 1-19
  17. VEMapStyle.Birdseye, // Map style
  18. false, // Fixed map
  19. VEMapMode.Mode2D, // Map mode
  20. true, // Map mode switch
  21. 0, // Tile buffer
  22. mapOptions // Options
  23. );
  24. }
  25. function ShowMiniMap(show) {
  26. if (show)
  27. map.ShowMiniMap();
  28. else
  29. map.HideMiniMap();
  30. }
  31. function ShowPushpin(title, imageName) {
  32. map.Clear();
  33. if (title != ”) {
  34. var point = map.GetCenter();
  35. var pushpin = map.AddPushpin(point);
  36. pushpin.SetTitle(title);
  37. }
  38. }
  39. Save and name the script Script and make sure to add the .js extension to the file, so that the file name will now be Script.js.

The next step is to create a .zip file containing the manifest and resource files and register this file with the control add-in in Microsoft Dynamics NAV.

Creating a Resource .Zip File

Before registering the control add-in in Microsoft Dynamics NAV, you must create one single file containing the manifest and any resource files. This single file is a .zip file and it will be registered in the Client Add-in page. The .zip file must contain a certain structure for it to be recognized by the Client Add-in page. In the next steps, you will create the right structure and a .zip file.

To create a resource .zip file

  1. On your computer, in a folder of your own choice, create the following folder structure: ImageScript, and StyleSheet.
  2. Locate the Manifest.xml file that you created in the previous steps, and copy this to the same folder structure. Then locate the Script.js file that you created in the previous steps, and copy this to the Script folder. Your folder should now look like this:


  3. Place images, scripts, and stylesheets in the right folders, but in this walkthrough we will leave the rest of these folders empty.
  4. In the Windows Explorer mark all of the folders and the manifest file and right-click, and then choose Send to…, and then choose Compressed (zipped) folder.
  5. Name the .zip file BingMapsControlAddIn.

Registering the Control Add-in in Microsoft Dynamics NAV

To register a control add-in, you include it in the Control Add-in page in Microsoft Dynamics NAV. To include a control add-in in the page, you must provide the following information:

  • Control Add-in name.The control add-in name is determined by theMicrosoft.Dynamics.Framework.UI.Extensibility.ControlAddInExport attribute value of control add-in class definition that you specified when you created the control add-in. The name in this walkthrough is BingMapsControl.
  • Public key token.This is a 16-character key that is given to the assembly when it is signed and built in Visual Studio. You can determine the public key token by running the Microsoft .NET Strong name Utility (sn.exe) on the assembly. You must run the utility from the Visual Studio command prompt. The sn.exe utility is available with Visual Studio.
  • Resource.On the Control Add-in page, the Resource field is a BLOB data type and the content of the field cannot be viewed from the development environment.When this field is filled in, Microsoft Dynamics NAV identifies the registered control add-in as a type of control add-in that works on all display targets.

To determine the public key token for the control add-in

  1. On the Windows taskbar, choose Start, choose All Programs, choose Microsoft Visual Studio 2013, choose Visual Studio Tools, and then choose Developer Command Prompt for VS2013 to open the command prompt.
  2. At a command prompt, change to the directory that contains the assembly that you copied. For example, C:\Program Files (x86)\Microsoft Dynamics NAV\90\RoleTailored Client\Add-ins.
  3. Type the following command: sn –T <assembly>

    Replace <assembly> with the assembly name, such as BingMapsControlAddIn.dll.

  4. Press Enter and note the public token key that is displayed.

To include the control add-in in the Control Add-in page

  1. Open Microsoft Dynamics NAV.
  2. In the Search box, enter Control Add-ins and then choose the related link.
  3. In the Control Add-ins window, choose New, and then in the Control Add-in Name column, enter the control add-in name. In the Public Key Token column, enter the public key token that you obtained earlier.

With the Control Add-in window still open, you will now import the .zip file for the BingMapsControlAddIn add-in.

To include the .zip file in the Control Add-in page

  1. Choose Import.
  2. In the Import Control Add-in Resource window, locate the BingMapsControlAddIn.zip file that you saved earlier, and then choose Open.
  3. Choose the OK button to close the Control Add-in page.

Creating a Page to Display the Control Add-in

You have set up the prerequisites for using a control add-in from a page. Now you need a way to display the BingMapsControlAddIn control. In this section, you will create a new page called Bing Maps that contains two fields to control the coordinates of the map and one field that contains the map control. This involves the following tasks:

  • Creating a new page called Bing Maps.
  • Setting variables and properties.
  • Adding C/AL triggers.

To create the Bing Maps page

  1. In the Microsoft Dynamics NAV Development Environment, in Object Designer, choose Page, and then choose New.
  2. In the New Page dialog, choose Create blank page and then choose the OK button.
  3. In Page Designer, on the first line, in the Name column, enter Control1, and go to the next line.
  4. In the Type column, choose Group, and in the Caption column, enter Coordinates.
  5. On a new line, in the Type column, choose Field. In the Name column, enter LatitudeControl, and in the Caption column, enter Latitude.
  6. On a new line, in the Type column, choose Field. In the Name column, enter LongitudeControl, and in the Caption column, enter Longitude.
  7. On a new line, choose Group, and in the Caption column, enter Map.
  8. On a new line, under the Map group, for the Type column set to Field, in the Name column, enter Bing Maps Control.

    Your page design should now look like this.


  9. Save and compile the page. Name the page Bing Maps.

Now you have created a page skeleton. The next step is to add code and call the control add-in from a control on the page.

To add variables and properties

  1. In the Microsoft Dynamics NAV Development Environment, in Object Designer, choose Page, and then choose the Bing Maps page.
  2. On the Tools menu, choose View, and then C/AL Globals.
  3. On the Variables tab, enter Latitude in the Name column, and set the DataType to Decimal.
  4. Create a new variable. Enter Longitude in the Name column, and set the DataType to Decimal.
  5. Create a new variable. Enter MiniMap in the Name column, and set the DataType to Boolean.
  6. Close the C/AL Globals window.
  7. In Page Designer, on LatitudeControl, set SourceExpr to Latitude in the C/AL Symbol Menu.
  8. On LongitudeControl, set SourceExpr to Longitude in the C/AL Symbol Menu.
  9. Select the BingMapsControl field, and then on the View menu, choose Properties.
  10. In the Properties window, locate the ControlAddIn property and choose the Up Arrow. Select the BingMapsControl control add-in from the Client Add-in window.
  11. Choose the OK button to close the Client Add-In window. The public key token is inserted into the Value field. Close the Properties window.

To add C/AL triggers

  1. With the Bing Maps page open in Object Designer, on the View menu, choose C/AL Code.
  2. In the Page Bing Maps – C/AL Editor window, locate the BingMapControl::ControlAddInReady() trigger, and add the following line of code.
  3. CurrPage.BingMapControl.LoadMap(Latitude, Longitude);
  4. In the Page Bing Maps – C/AL Editor window, locate the BingMapControl::MapLoaded() trigger, and add the following line of code.
  5. CurrPage.BingMapControl.ShowMiniMap(MiniMap);
  6. Finally, locate the OnInit() trigger, and add the following line of code.
  7. Latitude := 40.689467;
  8. Longitude := 74.044444;
  9. Save and compile the Bing Maps page.

After you have saved and compiled the Bing Maps page, you can run the page directly from the development environment to verify that it works on the Microsoft Dynamics NAV Web client.

Above script is copied from

https://msdn.microsoft.com/en-us/library/dn182584(v=nav.90).aspx

And Thanks to Vjeko

To download the file please use below link
 

https://1drv.ms/u/s!AjsNk_xi_lgtgqFy4zG2b0fRB-0lZw

navision 2015

How to Create and use Self-signed SSL Certificate for Dynamics NAV

Introduction

  • This article explains how to create an SSL certificate for a Test environment.
  • For a Live environment, you must purchase SSL certificate from a certification authority, for example ComodoSymantecDigicert, etc.
  • Keep a copy of Certificate Thumbprint and a copy of the Certificate generated.

Pre-Requisites

Download Self-signed certificate generator (PowerShell).


Create SSL Certificate

  1. Open Windows Powershell ISE – Run as administrator
  2. Know you Execution Policy:
    1. The following command gets the current execution policy: Get-ExecutionPolicy
    2. If it is Restricted, change the Execution Policy, for example in this case: Set-ExecutionPolicy -ExecutionPolicy RemoteSigned


  1. Go to the location where you saved the New-SelfSignedCertificateEx.ps1 file.
  2. Run the following command:
    Import-Module .\New-SelfSignedCertificateEx.ps1


  1. Run the following command, where you can find the <Full Computer Name> from system properties:
    New-SelfSignedCertificateEx –Subject “CN=<Full Computer Name>” –IsCA $true –Exportable –StoreLocation LocalMachine


  1. Copy and Save the Thumbprint for later use.

Manage Certificate

  1. Open Microsoft Management Console (mmc.exe)


  1. Click FileAdd/Remove Snap-in
  2. Select Certificates
  3. Click Add
  4. Select the Computer Account
  5. Click Finish and OK


Locate the Certificate

Now you can locate the Certificate under: Console RootCertificates (Local Computer)PersonalCertificates.

  • The name will be same as your service tier Machine.The Expiration Date Will be 1Y-2D (01 Year – 02 Days) for that certificate and it will be valid from 01 Day Before you create Certificate.

Assign Permissions to Certificate

  1. Right Click on the certificate.
  2. Click All TasksManage Private Keys
  3. Add Permission for the Account which is used to Run Dynamics NAV Services.


Copy and Paste Certificate

  1. Copy the Certificate from PersonalCertificates node.
  2. Paste the certificate into the Trusted Root Certification AuthoritiesCertificates node.


Download and Save the Certificate

  1. Right-click and Export the certificate


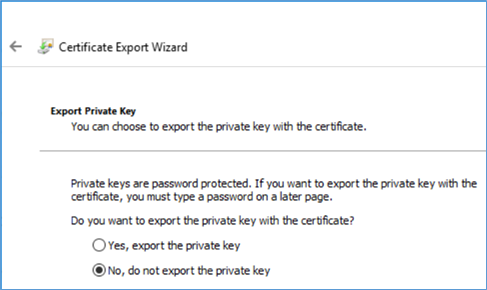
  1. Select the No, do not export the private key option


  1. Choose Next
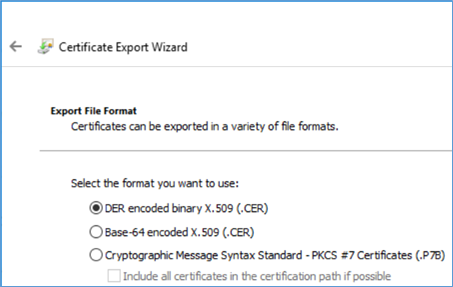
  2. Select DER encoded binary x.509 (.cer)


  1. Specify a File Name and Finish the wizard. For example, here we have saved it as “NAV_Certificate.cer”.


  1. Copy and Save the certificate for later use.
navision 2015

Metadata for object of type Table with id 20000000xx is in a failed state. This is caused by a previous exception: Object of type Table with id 20000000xx could not be found.

Hi all,

Metadata for object of type Table with id 2000000073 is in a failed state. This is caused by a previous exception: The specified path is invalid.

Metadata for object of type Table with id 20000000xx is in a failed state. This is caused by a previous exception: Object of type Table with id 20000000xx could not be found.

xx Can Be – 01,07,09,10,20,22,24,26,28,29,37,38,39,40,41,42,43,44,45,46,47,48,49,50,52,53,55,56,58,59,63,70.

These are the System Hidden Tables in Navision

Where is Metadata Stored?
Metadata is stored in Table 2000000071 Object Metadata for all navision objects ( visible / hidden).

Why this error?
This error occured if there in no metadata for any object in the table.

When Metadata is Created?
This has been created while we restore the database,if you remeber there is a new process in RTC Versions "PROCESSING OBJECTS" after creating keys.

How to create Metadata?
For Visible objects you can compile the object and the metadata will be created.
For Hidden tables, you need to work around.

Problem

The config file for the Dynamics NAV server is locked so if any changes are made a restart of the service is required.

The XXX.cs file indicates that the RTC debugging is enabled for the Dynamics NAv Server. The Dynamics NAv Server will then dump all the relevant objects in C# format to a specific folder. So it’s possible this was enabled?

Solution

Stop Navision Server and web server and restart windows . It will release the locks and now start the Navision server and webserver

Navision 2009, navision 2015

Upgrade Toolkit for Upgrading Data from Microsoft Dynamics NAV 2009 R2 or SP1 to Microsoft Dynamics NAV 2015

The cumulative update 1 of NAV2015 includes an upgrade toolkit for upgrading a Microsoft Dynamics NAV 2009 R2 or Microsoft Dynamics NAV 2009 SP1 database to Microsoft Dynamics NAV 2015. The upgrade toolkit includes several application objects in FOB files that simplify the upgrade process for those of you coming from Microsoft Dynamics NAV 2009 R2 or Microsoft Dynamics NAV 2009 SP1. 

You can download cumulative update 1 here

https://mbs2.microsoft.com/Knowledgebase/KBDisplay.aspx?scid=kb;EN-US;3013215

see the attached whitepaper about Upgrade Toolkit.


http://blogs.msdn.com/cfs-file.ashx/__key/communityserver-components-postattachments/00-10-56-97-14/Upgrading-NAV-2009-R2-or-NAV-2009-SP1-Database-to-NAV-2015.pdf


navision 2015

How to get Microsoft Dynamics NAV for tablets to connect using a self-signed certificate

Overview

This blog post helps you connect Microsoft Dynamics NAV for tablets using a self-signed certificate. The targets for the blog post are the following apps:

  • Dynamics NAV for iPad
  • Dynamics NAV for Android
  • Dynamics NAV for modern Windows

The Internet Information Services Manager (IIS) needs a trusted certificate that holds the private key for https. iOS and Android need the https certificate to be trusted by a root certificate.

In this blog post, you will be creating one certificate that is used for both the IIS to enable https and to install on your device. Follow the steps below and replace the following string:<your site name> with the name of the site. You can either use a real name likewww.abc.com, or use your pc name. It must match the first part of the URL that you have specified. Currently the PowerShell script New-SelfSignedCertificateEx supports Windows 8 and Windows Server 2012 and newer.

Steps

For the Microsoft Dynamics NAV Web server, do the following:

  1. Create the certificate:
    1. Open a PowerShell prompt with the option As administrator.
    2. Go to the directory where you saved the New-SelfSignedCertificateEx.ps1 file.
    3. Run the following command: Import-Module .\New-SelfSignedCertificateEx.ps1.
    4. Then run the following command: New-SelfSignedCertificateEx –Subject “CN=<your site name>” –IsCA $true –Exportable –StoreLocation LocalMachine –StoreName My.
    5. Manage the certificate:
      1. Open the mmc.exe.
      2. Go to the File menu, and then choose Add/Remove Snap-in...
      3. Select Certificates.
      4. Choose Add.
      5. Select the computer account.
      6. Choose Finish and then OK.
      7. Locate and copy the certificate you just created in the personal/certificates folder.
      8. Paste the certificate into the Trusted Root Certification Authorities/Certificates folder.
      9. Select the certificate, right-click and export the certificate.
      10. Select the No, do not export the private key option.
      11. Choose Next.
      12. Select DER encoded binary x.509 (.cer).
      13. Specify a location and filename and finish the wizard.
      14. Enable https: In IIS Manager, create a binding for https using the certificate you added.

Next

For iOS, do the following:

  1. Use the iPhone Configuration Utility tool from Applehttp://support.apple.com/downloads/#iphone or mail the certificate you exported.
  2. Run the certificate file and install the certificate.
  3. You are now ready to start the Dynamics NAV app.

For Windows, do the following:

  1. If you run the client on the same box as the web server, then you are all set to go.
  2. Copy the certificate you exported to the tablet, install the certificate and place the certificate in the Trusted root certification authorities folder of the local machine.

For Android, do the following:

  1. Copy or mail the certificate that you exported.
  2. Run the certificate file and install the certificate.
  3. You are now ready to start the Dynamics NAV app.

This should help you get up and running using self-signed certificates. Be aware that Microsoft Dynamics NAV for tablets does not support Always Ask certificates.

Navision 2009, navision 2015

Upgrade Toolkit for Upgrading Data from Microsoft Dynamics NAV 2009 R2 and Microsoft Dynamics NAV 2009 SP1 to Microsoft Dynamics NAV 2013 R2

The components needed to upgrade data directly from Microsoft Dynamics NAV 2009 R2 to Microsoft Dynamics NAV 2013 R2 are now available for download.


Download the upgrade toolkit from PartnerSource or from CustomerSource.

In order to use the toolkit to upgrade data from Microsoft Dynamics 2009 R2 or Microsoft Dynamics NAV 2009 SP1, you will also need the Microsoft Dynamics NAV 2013 development environment and Microsoft Dynamics NAV 2013 R2.


In Microsoft Dynamics NAV 2013 R2, we introduced support for converting a Microsoft Dynamics NAV 2013 database so that you can run an application that was created in Microsoft Dynamics NAV 2013 on the Microsoft Dynamics NAV 2013 R2 platform, also known as a technical upgrade.


Note: We strongly recommend that you upgrade the application objects as well so that your solution includes the important application fixes and new functionality that is introduced in Microsoft Dynamics NAV 2013 R2.


Secondly, you can fully automate the data upgrade process using the Windows PowerShell scripts that we included in the Microsoft Dynamics NAV 2013 R2 product media. Historically, this process has been known for its tediousness and high risk of human error when multiple operations had to be executed consecutively in all companies of the database that you were upgrading. The scripts automate this work so that you can test and execute your data upgrades more reliably.


Now with this delivery, we introduce an upgrade toolkit for upgrading the data from Microsoft Dynamics NAV 2009 R2 to Microsoft Dynamics NAV 2013 R2. This significantly simplifies the upgrade process for those of you coming from Microsoft Dynamics NAV 2009 R2 – or Microsoft Dynamics NAV 2009 SP1.


Included in the new upgrade toolkit are all known data upgrade-related application hotfixes that we are aware of, and we also addressed several platform issues that affected the upgrade scenario.


Note: You must download the latest Microsoft Dynamics NAV platform hotfixes before you start using the upgrade toolkit. The required hotfixes for Microsoft Dynamics NAV 2013 are available in the latest hotfix rollup, which you can download from PartnerSource or CustomerSource. For Microsoft Dynamics NAV 2013 R2, you can download the required hotfixes from PartnerSource or CustomerSource.


When you download the new upgrade toolkit from the link above, you can use it to simply your upgrade process. Here are the main steps in upgrading from Microsoft Dynamics NAV 2009 R2 (or Microsoft Dynamics NAV 2009 SP1) by using the new upgrade toolkit


To upgrade data from a Microsoft Dynamics NAV 2009 R2 or Microsoft Dynamics NAV 2009 SP1 database

In the Microsoft Dynamics NAV 2009 R2 or Microsoft Dynamics NAV 2009 SP1 development environment (Classic client):

Create a copy or a backup of your old Microsoft Dynamics NAV 2009 R2 database, and open it in the Microsoft Dynamics NAV 2009 R2 development environment.

Add your partner license to the database.

You can do this by selecting the Save License in Database field in the Alter Database window. If the field was not already selected, a dialog box opens so you can specify the location of your partner license.

If the field was already selected, upload the partner license from the License Information window.

Open the Object Designer, and then import Upgrade601701.1.fob. If the .fob file contains objects with conflicting versions that are already in the database, the Import Worksheet window opens. Choose Replace All.

For each company in the database, open the company, and make the relevant changes to data and objects. For more information, see Task 3: Data/Object Changes Prior to Step 1 in the MSDN Library.

Then, from the Object Designer, run form 104001, Upgrade – Old Version. Choose the Transfer Data button.

Repeat step 1 for each company in the database. Then, from the Object Designer, run form 104001, Upgrade – Old Version. Choose the Delete Objects button.

This action deletes all objects in the database that are not tables, but also obsolete tables that belong to functionality that is not available in Microsoft Dynamics NAV 2013 R2.

Uninstall Microsoft Dynamics NAV 2009 R2, and then install Microsoft Dynamics NAV 2013.

Change the compatibility level of your database. For SQL Server 2008 and SQL Server 2008 R2, verify that the compatibility level of the database is set to 100. For SQL Server 2012, set the compatibility level to 110.

In the Microsoft Dynamics NAV 2013 development environment, open the Microsoft Dynamics NAV 2009 R2 database and agree to convert the database. The database has now been technically upgraded to Microsoft Dynamics NAV 2013.

Uninstall Microsoft Dynamics NAV 2013, and then install Microsoft Dynamics NAV 2013 R2.

In the Microsoft Dynamics NAV 2013 R2 development environment:

Open the Microsoft Dynamics NAV 2013 database and agree to convert the database.

Compile the system tables. You can find the tables by setting a filter for table ID 2000000004..2000000130.

In the following step, you will be connecting a Microsoft Dynamics NAV Server instance to the database.

Make sure that the service account that the Microsoft Dynamics NAV Server instance uses has the db_owner role for the database. Connect the Microsoft Dynamics NAV Server instance to the database, and then start the service instance.

In the Microsoft Dynamics NAV 2013 R2 development environment:

On the Tools menu, open Options, and then, make sure that the Prevent data loss from table changes field is set to Yes.You must also make sure that the Server Name, Server Instance, and Server Port fields are filled in.

This ensures that the Microsoft Dynamics NAV Server instance that is connected to the database will verify that no operation will cause loss of data in the development environment.

Import all customized objects in .fob format into the upgraded database. If the .fob file contains objects with conflicting versions that are already in the database, the Import Worksheet window opens. Choose Replace All.

Make sure all objects are compiled.

Import Upgrade Step 2 objects from the Upgrade601701.2.fob file.If the .fob file contains objects with conflicting versions that are already in the database, the Import Worksheet window opens. Choose Replace All.

Open the Microsoft Dynamics NAV 2013 R2 Windows client, and make sure that you are connected to the Microsoft Dynamics NAV Server instance that is connected to the upgraded database.

Next, you will run Upgrade Step 2 in each company in the upgraded database. You can get a list of all existing companies in the database by running the Get-NAVCompany cmdlet and passing as an argument the Microsoft Dynamics NAV Server instance which is connected to the upgraded database.

You will run objects directly from the development environment, so you must specify the company that the objects must run in in the Options window.

In the Microsoft Dynamics NAV 2013 R2 development environment:

On the Tools menu, open Options, and then, in the Company field, specify the name of the first company.

In the Object Designer, find page 104002 Upgrade – New Version, and then choose Run.

In the Upgrade – New Version window, choose Test Database Connection to make sure that the C/AL code that is triggered by the actions on the page has access to the database.

If your database is on a named SQL Server instance, you must specify the name in the SQL Server Name field.

Choose Transfer Data.

If the process is successful, and you don’t have to revisit the upgrade logs, you can clean the content of the Upgrade Time Log table.

On the Navigate tab, choose Time Log, and then, in the Upgrade Time Log page, delete all records.

Close the Upgrade – New Version window, and then close the Microsoft Dynamics NAV Windows client.

Repeat step 10 for each remaining company in the database.

When you have successfully transferred data in the last company, you must upgrade data that is common to all companies in the database, such as permissions, permission sets, web services, profiles and control add-ins.

Import and run Upgrade601701.2.fob for all companies in the database.

Upgrade data common to all companies such as permissions, permission sets, web services, profiles and control add-ins.

If the customer has changed the Read/Write/Modify/Delete/Execute settings for any of the standard permissions, or customized default permission sets in any way, you must merge these changes into the default permissions sets and permissions that are included in Microsoft Dynamics NAV 2013 R2. You can use XMLport 104001 Import/Export Roles and XMLport 104002 Import/Export Permissions to export the new default roles and permissions from the CRONUS International Ltd. demonstration database in Microsoft Dynamics NAV 2013 R2. You can add control add-ins in the Control Add-ins window in the Microsoft Dynamics NAV Windows client. For more information, see How to: Register a Windows Client Control Add-in.

Delete the upgrade toolkit objects.

In the Upgrade – New Version window, choose Mark/Delete Upgrade Toolkit.

This deletes all upgrade toolkit objects, except tables

In the Microsoft Dynamics NAV development environment, delete the upgrade tables by setting a field filter for objects where the Version List contains Upgrade Toolkit Table – marked for deletion..

The database has now been through a data upgrade to Microsoft Dynamics NAV 2013 R2.

navision 2015

Now, all Microsoft Dynamics NAV partners should be available to download NAV 2015 license from Voice.

Now, all Microsoft Dynamics NAV partners should be available to download NAV 2015 license from Voice.

As earlier, you can choose standard Dev/Demo license or Dev/Demo license with 180 day trial period and select modules you want.

Go to https://businesscenter.mbs.microsoft.com/ to download it.

Thnks for Sharing   http://totovic.com/2014/10/05/nav-2015-license-for-partners/

Navision 2013, navision 2015

Steps to Upgrade Microsoft Dynamics nav 2013 R2 to Dynamics Nav 2015

Upgrade the application code.

Exporting all objects from the new customized Microsoft Dynamics NAV 2015 database to an objects.fob file.

Convert the database by opening it in the Microsoft Dynamics NAV 2015 development environment.

Prepare the data for the upgrade.

  1. Make sure that you are the only user connected to the database.
  2. Back up the database and save the backup file in a safe location.
  3. Make a copy of the customer’s database in SQL Server Management Studio. You will upgrade the copy and keep the original.
  4. Identify a User ID and password for a superuser in the system or create a new superuser that you can use for the upgrade process. Log in as the superuser when you perform the upgrade. 
  5. Verify that you have the dbcreator and securityadmin Server Roles for the Microsoft Dynamics NAV SQL Server instance by using SQL Server Management Studio. To manage companies, objects, and licenses in a Microsoft Dynamics NAV database you must also have the db_owner database permission.
  6. Disable integration properties for the database.
  7. Open the database in the Microsoft Dynamics NAV 2015 development environment.
  8. Run a database test to determine the state of the customer’s database.
  9. Run the Adjust Cost – Item Entries batch job to make sure that the inventory cost data in the customer’s database is up to date.
  10. For each company in the database that posts inventory costs to the Microsoft Dynamics NAV general ledger, run the Post Inventory Cost to G/L batch job.

Import the Upgrade Step 1 objects, and then perform Step 1 data conversion.

Export permission sets and permissions.

Delete all objects except tables.

Import the customized objects from the objects.fob file.

Import the objects for upgrade step 2, and then perform Step 2 data conversion.

Import upgraded permission sets and permissions.

Initialize all companies.

Delete obsolete tables.

Delete the upgrade toolkit objects.

Test the database.


navision 2015

Tablet related Issues in Navision 2015 and their resolutions

Tablet: Cannot cancel unresponsive tasks

Description: During some operations Microsoft Dynamics NAV Tablet client may appear unresponsive and there is no way to cancel the operation. This may occur in any user interaction which results in a long-running task on the server, or one where connectivity is lost. Symptoms include the “running dots” which repeat endlessly.

Workaround: If the operation cannot be canceled, close the browser and re-open tablet.aspx.