
Introduction
-
This article explains how to create an SSL certificate for a Test environment.
-
Keep a copy of Certificate Thumbprint and a copy of the Certificate generated.
Pre-Requisites
Download Self-signed certificate generator (PowerShell).

Create SSL Certificate
-
Open Windows Powershell ISE – Run as administrator
-
Know you Execution Policy:
-
The following command gets the current execution policy: Get-ExecutionPolicy
-
If it is Restricted, change the Execution Policy, for example in this case: Set-ExecutionPolicy -ExecutionPolicy RemoteSigned
-

-
Go to the location where you saved the New-SelfSignedCertificateEx.ps1 file.
-
Run the following command:
Import-Module .\New-SelfSignedCertificateEx.ps1

-
Run the following command, where you can find the <Full Computer Name> from system properties:
New-SelfSignedCertificateEx –Subject “CN=<Full Computer Name>” –IsCA $true –Exportable –StoreLocation LocalMachine

-
Copy and Save the Thumbprint for later use.
Manage Certificate
-
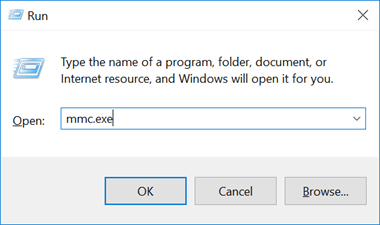
Open Microsoft Management Console (mmc.exe)
-
Click File, Add/Remove Snap-in
-
Select Certificates
-
Click Add
-
Select the Computer Account
-
Click Finish and OK

Locate the Certificate
Now you can locate the Certificate under: Console Root, Certificates (Local Computer), Personal, Certificates.
-
The name will be same as your service tier Machine.The Expiration Date Will be 1Y-2D (01 Year – 02 Days) for that certificate and it will be valid from 01 Day Before you create Certificate.

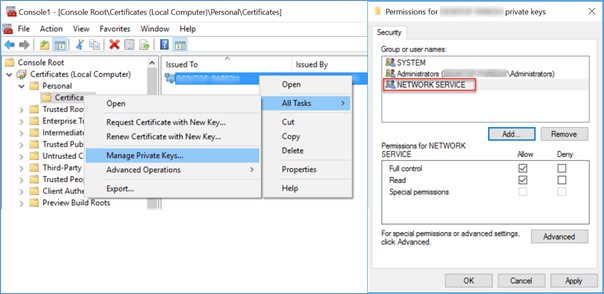
Assign Permissions to Certificate
-
Right Click on the certificate.
-
Click All Tasks, Manage Private Keys
-
Add Permission for the Account which is used to Run Dynamics NAV Services.
Copy and Paste Certificate
-
Copy the Certificate from Personal, Certificates node.
-
Paste the certificate into the Trusted Root Certification Authorities, Certificates node.

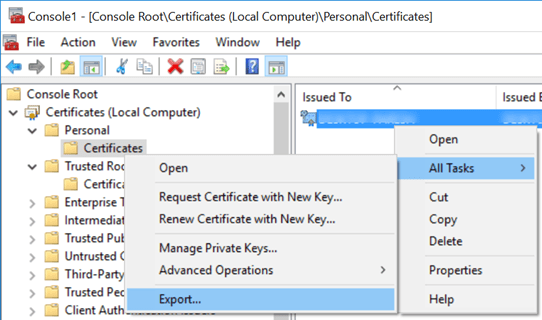
Download and Save the Certificate
-
Right-click and Export the certificate
-
Select the No, do not export the private key option

-
Choose Next
-
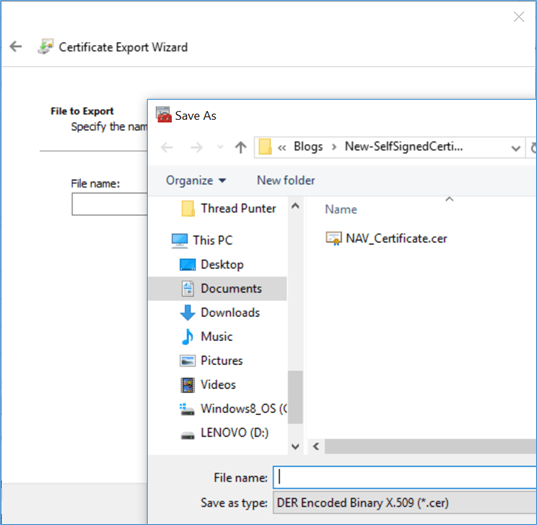
Select DER encoded binary x.509 (.cer)

-
Specify a File Name and Finish the wizard. For example, here we have saved it as “NAV_Certificate.cer”.
-
Copy and Save the certificate for later use.
